SMART Application Launch Framework Implementation Guide Release 1.0.0

This page is part of the Smart App Launch Implementation Guide (v1.0.0: STU 1) based on FHIR R3. The current version which supercedes this version is 2.0.0. For a full list of available versions, see the Directory of published versions 
SMART on FHIR’s authorization scheme uses OAuth scopes to communicate (and negotiate) access requirements. Providing apps with access to broad data sets is consistent with current common practices (e.g. interface engines also provide access to broad data sets); access is also limited based on the privileges of the user in context. In general, we use scopes for three kinds of data:
Launch context is a negotiation where a client asks for specific launch context
parameters (e.g. launch/patient). A server can decide which launch context
parameters to provide, using the client’s request as an input into the decision
process. When granting a patient-level scopes like patient/*.read, the server
SHALL provide a “patient” launch context parameter.
Here is a quick overview of the most commonly used scopes. Read on below for complete details.
| Scope | Grants |
|---|---|
patient/*.read |
Permission to read any resource for the current patient (see notes on wildcard scopes below) |
user/*.* |
Permission to read and write all resources that the current user can access (see notes on wildcard scopes below) |
openid fhirUser (or openid profile) |
Permission to retrieve information about the current logged-in user |
launch |
Permission to obtain launch context when app is launched from an EHR |
launch/patient |
When launching outside the EHR, ask for a patient to be selected at launch time |
offline_access |
Request a refresh_token that can be used to obtain a new access token to replace an expired one, even after the end-user no longer is online after the access token expires |
online_access |
Request a refresh_token that can be used to obtain a new access token to replace an expired one, and that will be usable for as long as the end-user remains online. |
SMART on FHIR defines OAuth2 access scopes that correspond directly to FHIR resource types. We define read and write permissions for patient-specific and user-level access. Apps that need to read existing data from an EHR (e.g., FHIR read and search interactions) should ask for read scopes. Apps that need to write data to an ehr (e.g., FHIR create, update, and delete) should ask for write scopes. EHRs may decide what specific interactions and operations will be enabled by these scopes.
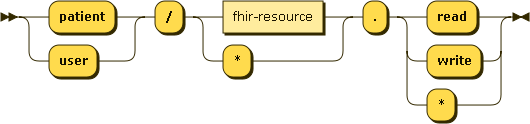
Expressed in EBNF notation, the clinical scope syntax is:
clinical-scope ::= ( 'patient' | 'user' ) '/' ( fhir-resource | '*' ) '.' ( 'read' | 'write' | '*' )`
Patient-specific scopes allow access to specific data about a single patient.
Which patient is not specified here: clinical data
scopes are all about what and not who which is handled in the next section.
Patient-specific scopes take the form: patient/:resourceType.(read|write|*). Note that some EHRs may not enable access to all related resources - for example, Practitioners linked to/from Patient-specific resources.
Let’s look at a few examples:
| Goal | Scope | Notes |
|---|---|---|
| Read all observations about a patient | patient/Observation.read |
|
| Read demographics about a patient | patient/Patient.read |
Note the difference in capitalization between “patient” the permission type and “Patient” the resource. |
| Add new blood pressure readings for a patient | patient/Observation.write |
Note that the permission is broader than our goal: with this scope, an app can add not only blood pressures, but other observations as well. Note also that write access does not imply read access. |
| Read all available data about a patient | patient/*.read |
See notes on wildcard scopes below |
User-level scopes allow access to specific data that a user can access. Note
that this isn’t just data about the user; it’s data available to that user.
User-level scopes take the form: user/:resourceType.(read|write|*).
Let’s look at a few examples:
| Goal | Scope | Notes |
|---|---|---|
| Read a feed of all new lab observations across a patient population: | user/Observation.read |
|
| Manage all appointments to which the authorizing user has access | user/Appointment.read user/Appointment.write |
Note that read and write both need to be supplied. (Write access does not imply read access.) |
| Manage all resources on behalf of the authorizing user | user/*.read user/*.write |
|
| Select a patient | user/Patient.read |
Allows the client app to select a patient |
As noted previously, clients can request clinical scopes that contain a wildcard (*) for both the FHIR resource as well as the requested permission for the given resource. When a wildcard is requested for the FHIR resource, the client is asking for all data for all available FHIR resources, both now and in the future. This is an important distinction to understand, especially for the entity responsible for granting authorization requests from clients.
For instance, imagine a FHIR server that today just exposes the Patient resource. The authorization server asking a patient to authorize a SMART app requesting patient/*.read should inform the user that they are being asked to grant this SMART app access to not just the currently accessible data about them (patient demographics), but also any additional data the FHIR server may be enhanced to expose in the future (eg, genetics).
When a wildcard is requested for the permission, as in the case of patient/Patient.*, the client is asking for both read and write access to the FHIR resource.
As with any requested scope, the scopes ultimately granted by the authorization server may differ from the scopes requested by the client! When dealing with wildcard clinical scope requests, this is often true.
As a best practice, clients should examine the granted scopes by the authorization server and respond accordingly. Failure to do so may lead to situations in which the client attempts to access FHIR resources they were not granted access only to receieve an authorization failure by the FHIR server.
For example, imagine a client with the goal of obtaining read and write access to a patient’s allergies and as such, requests the clinical scope of patient/AllergyIntolerance.*. The authorization server may respond in a variety of ways with respect to the scopes that are ultimately granted. The following table outlines several, but not an exhaustive list of scenarios for this example:
| Granted Scope | Notes |
|---|---|
patient/AllergyIntolerance.* |
The client was granted exactly what it requested: patient-level read and write access to allergies via the same requested wildcard scope. |
patient/AllergyIntolerance.readpatient/AllergyIntolerance.write |
The client was granted exactly what it requested: patient-level read and write access to allergies. However, note that this was communicated via two explicit scopes rather than a single wildcard scope. |
patient/AllergyIntolerance.read |
The client was granted just patient-level read access to allergies. |
patient/AllergyIntolerance.write |
The client was granted just patient-level write access to allergies. |
patient/*.read |
The client was granted read access to all data on the patient. |
patient/*.* |
The client was granted its requested scopes as well as read/write access to all other data on the patient. |
patient/Observation.read |
The client was granted an entirely different scope: patient-level read access to the patient’s observations. While this behavior is unlikely for a production quality authorization server, this scenario is technically possible. |
| none | The authorization server chose to not grant any of the requested scopes. |
As a best practice, clients are encouraged to request only the scopes and permissions they need to function and avoid the use of wildcard scopes purely for the sake of convenience. For instance, if your allergy management app requires patient-level read and write access to allergies, requesting the patient/AllergyIntolerance.* scope is acceptable. However, if your app only requires access to read allergies, requesting a scope of patient/AllergyIntolerance.read would be more appropriate.
Many apps rely on contextual data from the EHR to answer questions like:
To request access to such details, an app asks for “launch context” scopes in
addition to whatever clinical access scopes it needs. Launch context scopes are
easy to tell apart from clinical data scopes, because they always begin with
launch.
There are two general approaches to asking for launch context data, depending on the details of how your app is launched.
Apps that launch from the EHR will be passed an explicit URL parameter called
launch, whose value must associate the app’s
authorization request with the current EHR session. For example, If an app receives the URL
parameter launch=abc123, then it requests the scope launch and provides an
additional URL parameter of launch=abc123.
Standalone apps that launch outside the EHR do not have any EHR context at the outset. These apps must explicitly request EHR context by using the following scopes:
| Requested Scope | Meaning |
|---|---|
launch/patient |
Need patient context at launch time (FHIR Patient resource) |
launch/encounter |
Need encounter context at launch time (FHIR Encounter resource) |
| (Others) | This list can be extended by any SMART EHR if additional context is required. |
access_tokenOnce an app is authorized, the token response will include any context data the
app requested – along with (potentially!) any unsolicited context data the EHR
decides to communicate. For example, EHRs may use launch context to communicate
UX and UI expectations to the app (see need_patient_banner below).
Launch context parameters come alongside the access token. They will appear as JSON parameters:
{
  access_token: "secret-xyz",
  patient: "123",
  ...
}
Here are the launch context parameters to expect:
| Launch context parameter | Example value | Meaning |
|---|---|---|
patient |
"123" |
String value with a patient id, indicating that the app was launched in the context of FHIR Patient 123. If the app has any patient-level scopes, they will be scoped to Patient 123. |
encounter |
"123" |
String value with an encounter id, indicating that the app was launched in the context of FHIR Encounter 123. |
need_patient_banner |
true or false (boolean) |
Boolean value indicating whether the app was launched in a UX context where a patient banner is required (when true) or not required (when false). An app receiving a value of false should not take up screen real estate displaying a patient banner. |
intent |
"reconcile-medications" |
String value describing the intent of the application launch (see notes below) |
smart_style_url |
"https://ehr/styles/smart_v1.json" |
String URL where the host’s style parameters can be retrieved (for apps that support styling) |
intent: Some SMART apps might offer more than one context or user interface
that can be accessed during the SMART launch. The optional intent parameter
in the launch context provides a mechanism for the SMART host to communicate to
the client app which specific context should be displayed as the outcome of the
launch. This allows for closer integration between the host and client, so that
different launch points in the host UI can target specific displays within the
client app.
For example, a patient timeline app might provide three specific UI contexts,
and inform the SMART host (out of band, at app configuration time) of the
intent values that can be used to launch the app directly into one of the
three contexts. The app might respond to intent values like:
summary-timeline-view - A default UI context, showing a data summaryrecent-history-timeline - A history display, showing a list of entriesencounter-focused-timeline - A timeline focused on the currently in-context encounterIf a SMART host provides a value that the client does not recognize, or does not provide a value, the client app should display a default application UI context.
Note: SMART makes no effort to standardize intent values. Intents simply
provide a mechanism for tighter custom integration between an app and a SMART
host. The meaning of intents must be negotiated between the app and the host.
smart_style_url: In order to mimic the style of the SMART host more closely,
SMART apps can check for the existence of this launch context parameter and
download the JSON file referenced by the URL value, if provided.
The URL should serve a “SMART Style” JSON object with one or more of the following properties:
{
  color_background: "#edeae3",
  color_error: "#9e2d2d",
  color_highlight: "#69b5ce",
  color_modal_backdrop: "",
  color_success: "#498e49",
  color_text: "#303030",
  dim_border_radius: "6px",
  dim_font_size: "13px",
  dim_spacing_size: "20px",
  font_family_body: "Georgia, Times, 'Times New Roman', serif",
  font_family_heading: "'HelveticaNeue-Light', Helvetica, Arial, 'Lucida Grande', sans-serif;"
}
The URL value itself is to be considered a version key for the contents of the SMART Style JSON:
hosts must return a new URL value in the smart_style_url launch context parameter if the contents
of this JSON is changed.
| Style Property | Description |
|---|---|
color_background |
The color used as the background of the app. |
color_error |
The color used when UI elements need to indicate an area or item of concern or dangerous action, such as a button to be used to delete an item, or a display an error message. |
color_highlight |
The color used when UI elements need to indicate an area or item of focus, such as a button used to submit a form, or a loading indicator. |
color_modal_backdrop |
The color used when displaying a backdrop behind a modal dialog or window. |
color_success |
The color used when UI elements need to indicate a positive outcome, such as a notice that an action was completed successfully. |
color_text |
The color used for body text in the app. |
dim_border_radius |
The base corner radius used for UI element borders (0px results in square corners). |
dim_font_size |
The base size of body text displayed in the app. |
dim_spacing_size |
The base dimension used to space UI elements. |
font_family_body |
The list of typefaces to use for body text and elements. |
font_family_heading |
The list of typefaces to use for content heading text and elements. |
SMART client apps that can adjust their styles should incorporate the above property values into their stylesheets, but are not required to do so.
Optionally, if the client app detects a new version of the SMART Style object
(i.e. a new URL is returned the smart_style_url parameter), the client can
store the new property values and request approval to use the new values from
a client app stakeholder. This allows for safeguarding against poor usability
that might occur from the immediate use of these values in the client app UI.
Some apps need to authenticate the clinical end-user. This can be accomplished
by requesting a pair of OpenID Connect scopes: openid and fhirUser. A
client may also request openid profile instead of openid fhirUser, but the
profile claim is being deprecated in favor of fhirUser.
When these scopes are requested (and the request is granted), the app will
receive an id_token
that comes alongside the access token.
This token must be validated according to the OIDC specification.
To learn more about the user, the app should treat the fhirUser claim as the URL of
a FHIR resource representing the current user. This will be a resource of type
Patient, Practitioner, RelatedPerson, or Person. Note that Person is only used if the other resource type do not apply to the current user, for example, the “authorized representative” for >1 patients.
The OpenID Connect Core specification
describes a wide surface area with many optional capabilities. To be considered compatible
with the SMART’s sso-openid-connect capability, the following requirements apply:
Response types: The EHR SHALL support the Authorization Code Flow, with the request parameters as defined in this guide. Support is not required for parameters that OIDC lists as optional (e.g. id_token_hint, acr_value), but EHRs are encouraged to review these optional parameters.
Public Keys Published as SHALL Keys: The EHR SHALL publish public keys as bare JWK keys (which MAY also be accompanied by X.509 representations of those keys).
Claims: The EHR SHALL support the inclusion of SMART’s fhirUser claim within the id_token issued for any requests that grant the openid and fhirUser scopes. Some EHRs may use the profile claim as an alias for fhirUser, and to preserve compatibility, these EHRs should continue to support this claim during a deprecation phase.
Signed ID Token: The EHR SHALL support Signing ID Tokens with RSA SHA-256.
A SMART app SHALL NOT pass the auth_time claim or max_age parameter to a server that does not support receiving them.
Note that support for the following features is optional:
claims parameters on the authorization requestTo request a refresh_token that can be used to obtain a new access token
after the current access token expires, add one of the following scopes:
| Scope | Grants |
|---|---|
online_access |
Request a refresh_token that can be used to obtain a new access token to replace an expired one, and that will be usable for as long as the end-user remains online. |
offline_access |
Request a refresh_token that can be used to obtain a new access token to replace an expired token, and that will remain usable for as long as the authorization server and end-user will allow, regardless of whether the end-user is online. |
Additional context parameters and scopes can be used as extensions using the following namespace conventions:
__ (two underscores)GET {issuer}/.well-known/openid-configurationfhirUser claim and treat it as the URL of a FHIR resourceIn some circumstances - for example, exchanging what scopes users are allowed to have, or sharing what they did choose), the scopes must be represented as URIs. When this is done, the standard URI is to prefix the SMART scopes with http://smarthealthit.org/fhir/scopes/, so that a scope would be http://smarthealthit.org/fhir/scopes/patient/*.read.
openID scopes have a URI prefix of http://openid.net/specs/openid-connect-core-1_0#
Section is marked as “experimental” to indicate that there may be future backwards-incompatible changes to the style document pointed to by the smart_style_url. ↩